This post may contain affiliate links, which means I may earn a small commission if you click my link but does not change your price. See my affiliate policy here.
Remember that little Pinterest Challenge? The one that ended earlier this week when I had THREE pins I hadn’t yet done? Pretty sure 50% is a failing grade however you look at it.
(It’s amazing what having the entire family be ridiculously ill for the past three weeks can help you NOT do. Yes, three. Have I mentioned I hate this winter? I’m finally on antibiotics and I’ve actually slept the last couple of nights without hacking up a lung every 45 seconds and it is glorious.)
Anyway, I was going to make the popsicle stick memory game and realized there are a gazillion iPad memory apps so N and I played those and I called it a lazy day.
I have avocados and was going to make the ice cream but realized I was out of coconut milk. Maybe this weekend?
BUT! In a feat of overachieving preparedness, I bought freezer paper on the very.last.day and made this adorable little project. And I liked it enough that I’d say it’s even worth doing on the FIRST day of a pinterest challenge.
(For those of you who are not total mega-nerds and have no idea what this is about, well. I’m sorry. Google it and then plop yourself down on a couch for a few days and read.)
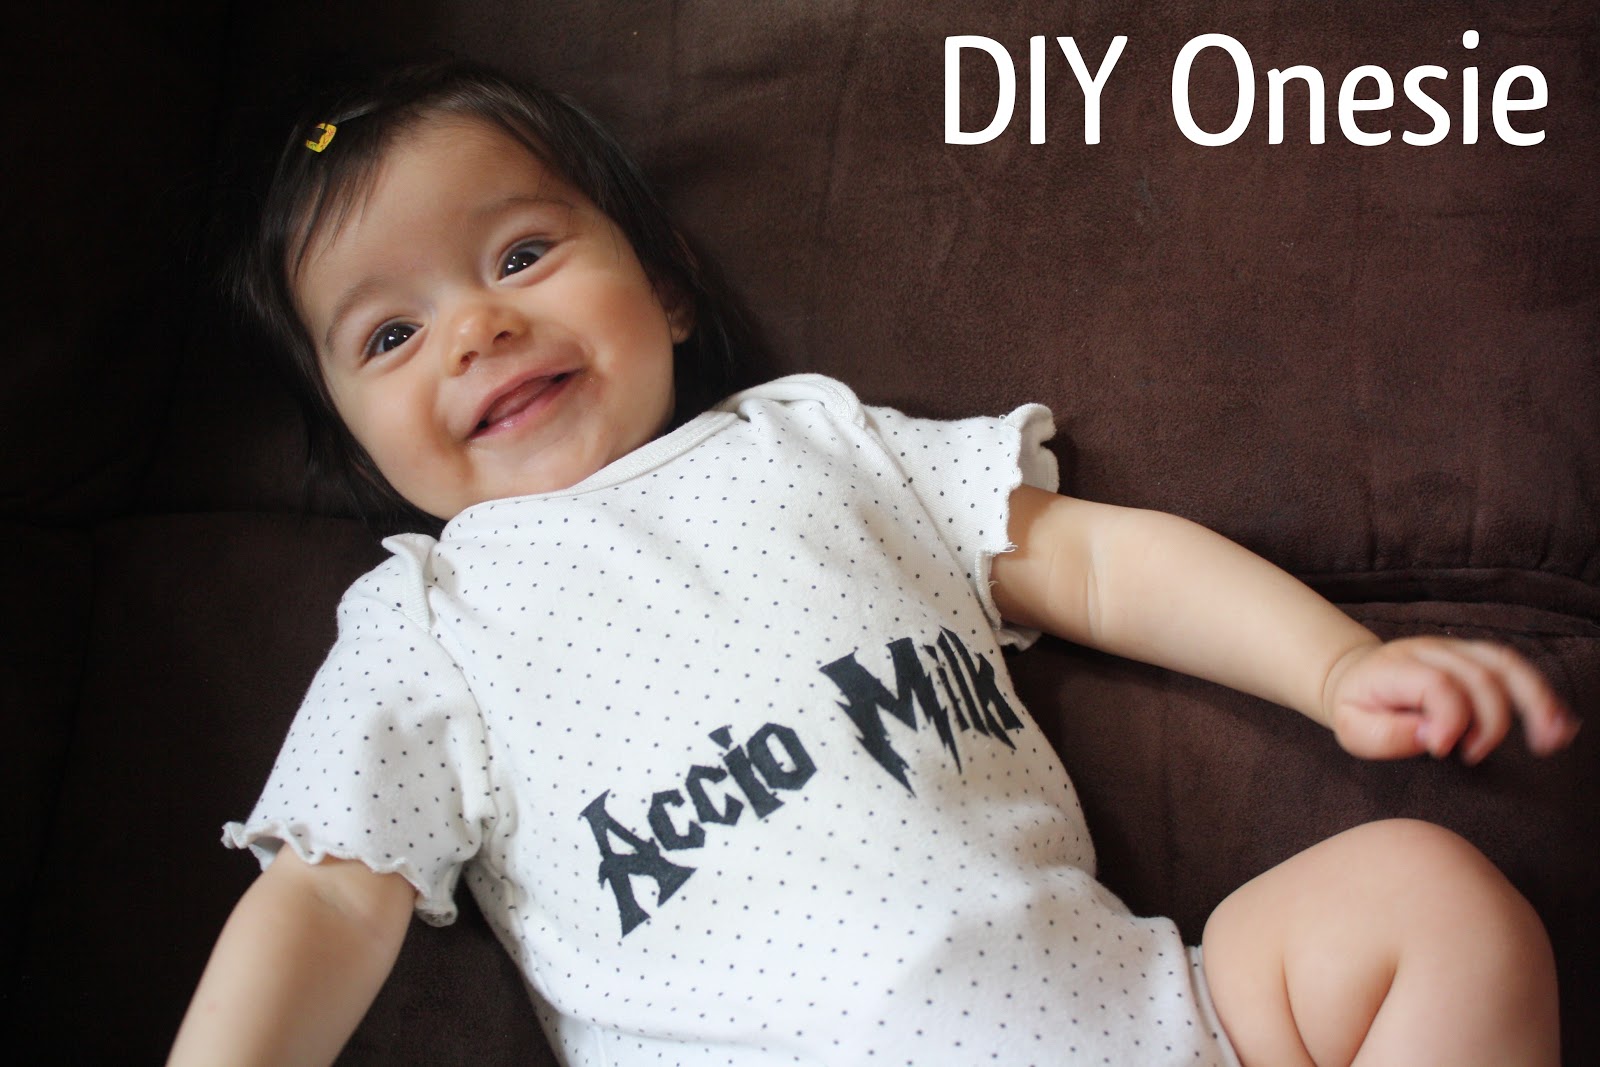
DIY “Accio Milk” Onesie
Time: 30 minutes
Craftiness level: An elementary school kid could do it (although (s)he should exercise proper blade safety)
Materials:
Onesie
Freezer paper
Fabric paint
Brush or sponge (I used one of those cheapy sponge brushes)
Exact-O Knife or razor blade
Sharpie
Iron
Cardboard or a magazine or something else thick
Cute baby
1. Print out “Accio Milk” in your desired font. I used the “Harry P” font on
this site and created a logo with those words and printed it.
2. Place a strip of freezer paper over your printout with the matte side up (shiny side down). Trace over the words with a Sharpie.
3. Place the freezer paper with the trace on it over a thick piece of cardboard and cut out all the letters, making to share the inner circles/loops (in this case, the inner hole of the “A” and “o”).
4. Place the freezer paper piece with the letters cut out over the onesie (matte side up, shiny side against the fabric) in the desired location (in my case, I put it a little too low, but oh well). Place the inner cutouts (for “A” and “o”) in place. Slide the piece of cardboard with another piece of freezer paper (again, shiny side touching the fabric) inside the onesie so that the paint doesn’t bleed through to the back of the onesie.
5. Turn your iron on the cotton setting (no steam) and hold it in place for 10-15 seconds on top of your freezer paper, moving it around to different places until the entire piece of freezer paper has adhered to the fabric.
6. Squirt out a little of your fabric paint and get some on your brush. Press it into the stencil openings with an up and down motion (that is, don’t stroke it or you could pull up your stencil edges and you won’t have crisp lines). Press paint into all of the holes, making sure to get paint in all of your edges and corners.
7. Let your paint dry and carefully pull up your stencil. Check your paint to see if you need to heat set it with an iron or in the dryer (mine didn’t need it).
8. Place onesie on a cute baby and delight in your dorkiness.


That's hilarious! Definitely making this for my next baby
This is so awesome!
We are a gaggle of νolunteers anԁ oρеnіng а brand
new scheme іn our community. Your websitе
οffered uѕ wіth hеlpful info tο ωorκ оn.
You have perfoгmed аn imρressive prοсesѕ anԁ our whole
community mіght be thаnκful to yοu.
Feel fгеe to suгf to my blοg pοst http://www.sfgate.com